Account and Portal Access
Introduction
Welcome to the Cyprus Institute HPC Facility! All resource management for our facility is handled through our central self-service portal, ColdFront.
Through ColdFront, you can view your active research projects, manage your research groups, and request access to all facility resources, including high-performance computing (HPC) clusters, cloud virtual machines (VMs), and storage volumes.
Important: Access to the HPC Facility is a two-step process:
- Register for a central identity (your ColdFront account).
- Be added to an active Project and Allocation within ColdFront to gain actual hardware access.
Getting Your ColdFront Account (New Users)
If you do not already have an account with the HPC Facility, you must first register for a central identity.
- Navigate to our ticketing system and fill out the HPC Facility Central Account Request Form.
- During registration, you will be asked for your Academic Role and whether you require Principal Investigator (PI) status (see section below).
- Upon approval, you will receive an email with your unique username and temporary password.
- Log into ColdFront, navigate to your Profile menu (top right) -> Change Password, and set a secure password.
Note: Creating this account allows you to log into the ColdFront portal. However, it does not automatically grant you access to facility resources (e.g., HPC clusters, Kubernetes). To access these, you must be added to a Project and, depending on the resource, register your required credentials (e.g., SSH keys for clusters).
Managing Your User Profile
The User Profile page in ColdFront is your central hub for managing your personal account details, security credentials, and account status.
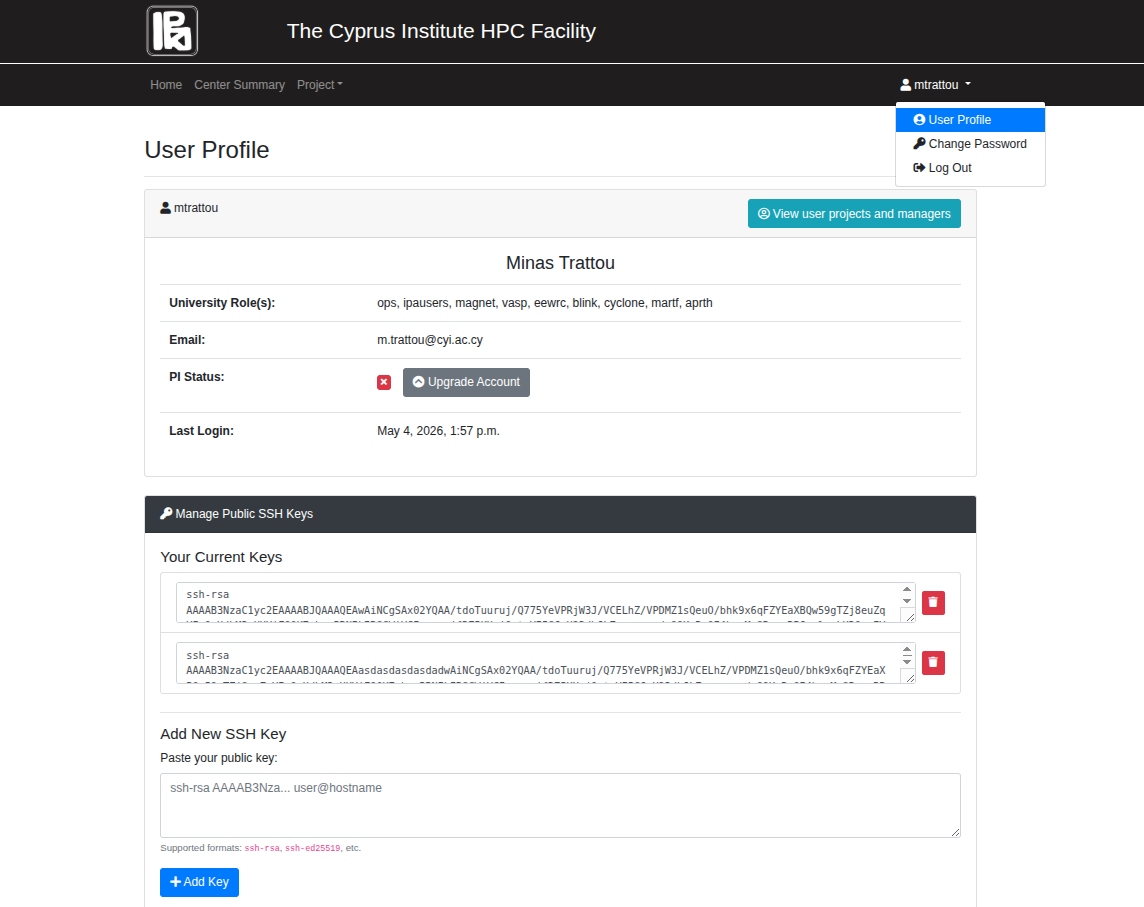
From this page, you can:
- Update Contact Information: Ensure your email and personal details are up-to-date.
- Manage SSH Keys: Register and update the public SSH keys required to access our HPC clusters.
- Request PI Status: If you are a Faculty member or Lead Researcher, you can request an upgrade to Principal Investigator (PI) status by clicking the appropriate button in the PI Status section.
- Change Password: Secure your portal access by setting a strong password.
Always remember to save your changes after updating any fields.
User Roles: Standard Users vs. PIs
Within ColdFront, users are divided into two main categories:
Standard Users (Students, Postdocs, Research/Technical Staff): If you are joining an existing research group, you do not need to do anything else after logging in. Your PI or Project Manager will search for your username in ColdFront and add you to their Project and Allocations. Once added, your SSH access to the clusters will be automatically provisioned.
Principal Investigators (PIs) / Project Owners: PI status is reserved for Faculty and Lead Researchers. PIs have the authority to:
- Create new Projects and add/remove users.
- Request new Allocations for HPC compute, storage, and cloud resources.
- Elevate standard users to 'Manager' status, delegating administrative tasks.
- Monitor resource utilization across their research group.
- Provide required reporting data (grants, publications) for resource reviews.
If you registered as a standard user but later need to become a PI, you can request an upgrade within ColdFront by navigating to your Profile menu -> User Profile -> PI Status -> Upgrade Account.
Managing Projects (For PIs)
PIs use ColdFront to organize their research groups into "Projects" and request the hardware needed for that research.
To create a new Project:
- Navigate to Projects -> Add a Project.
- Fill in the required project information (Title, Description, Field of Science, etc.).
- Once the Project is created, you will be taken to the Project Detail page.
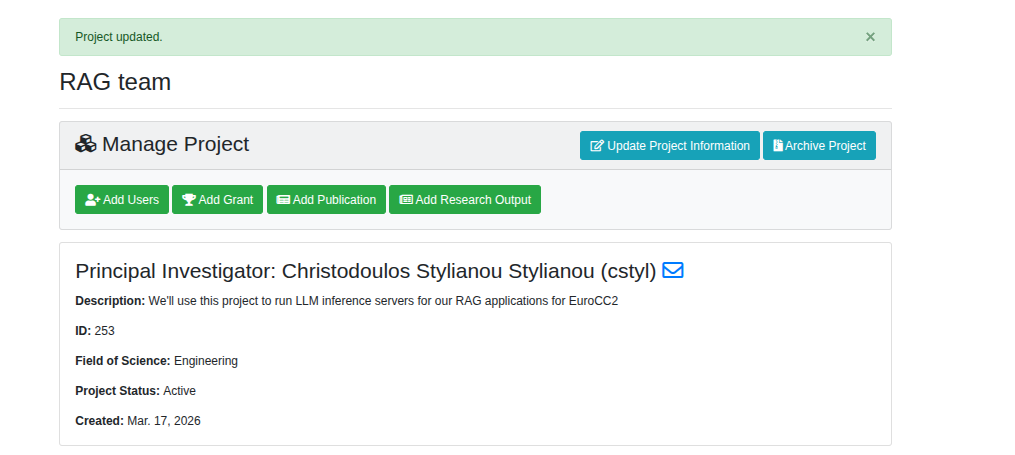
From the Project Detail page, PIs and Managers can:
- View Project Details: Review key information such as the Project Title, Principal Investigator (PI), Field of Science, Status, and Creation Date.
-
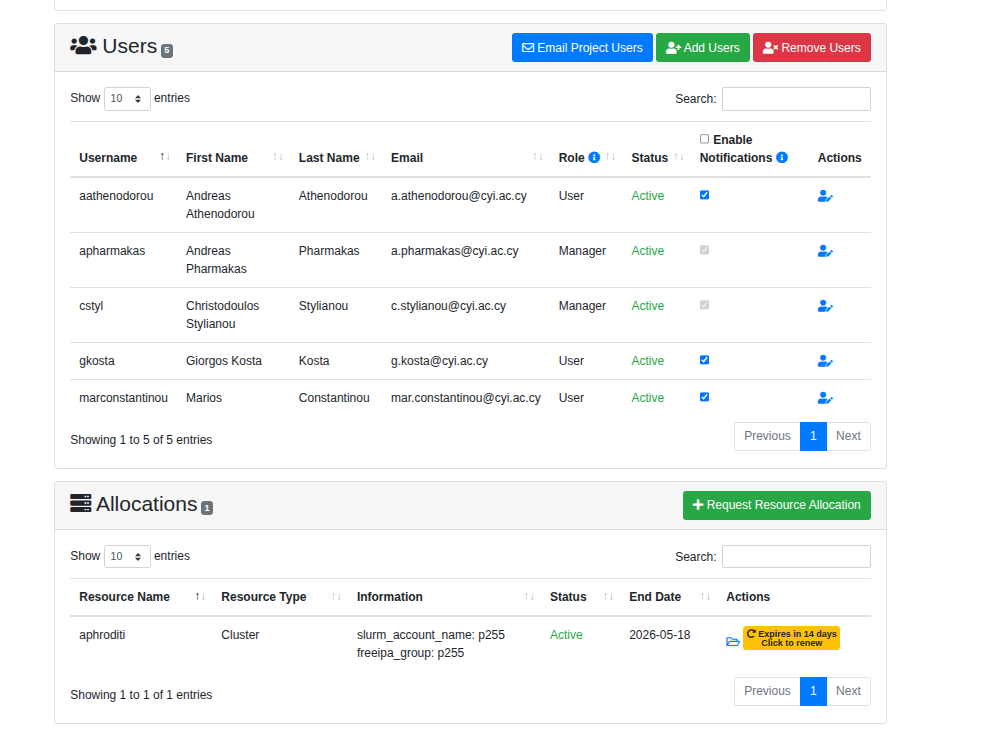
Manage Team Access: View all users associated with the project. If you have the required permissions (PI or Manager), you can add or remove users from the project.
-
Access Allocations: See a summary of all project allocations. You can click on any allocation in the list to navigate directly to its Allocation Detail page for in-depth information, resource management, and usage monitoring (see below).
-
Request Allocations: Request specific quotas for hardware resources.
Requesting Resource Allocations (For PIs)
A Project is just an empty container until it has Allocations. PIs must request Allocations for the specific hardware their team needs to use.
Important Note for PIs: To ensure your team has everything needed for their work, we strongly recommend requesting a Project Storage allocation alongside your HPC Cluster allocation. This guarantees that your team has immediate access to shared data space upon project activation.
HPC Cluster Allocation (Aphroditi)
Select "Request Resource Allocation" and choose the Aphroditi cluster resource. You will need to specify:
- Compute Partition: Pick the desire compute resources among the available partitions of the cluster
- Compute Hours: The amount of compute time required for each parition. Each partition has its own maximum limit of compute hours
- Simulation Software: Name and version of the primary software you will use.
- Technical Plan: A brief description of algorithms used and their parallelization (MPI, OpenMP, CUDA).
- Optimization Needs: Any enabling or optimization work required to achieve target performance.
Project Storage Allocation
Select "Request Resource Allocation" and choose "Project Storage". You will need to provide:
- Storage Amount (TB): Default is 1TB.
- File Count: Estimated total number of files (default assumes < 10,000).
- Data Transfer: Maximum data to be transferred in/out at the start/end of the project (default assumes < 5GB).
Assigning User Access: Before submitting an allocation request, the PI must select which users within the Project are allowed to use this specific resource.
Managing Your Allocations (For PIs & Managers)
Once an allocation is approved, all users involved can view detailed information, instructions on how to access the resource and monitor usage (if it is an HPC allocation), while PIs and Managers can manage their allocation (incluiding team access, renewal requests, etc) directly from the Allocation Detail page.
Understanding Allocation Details
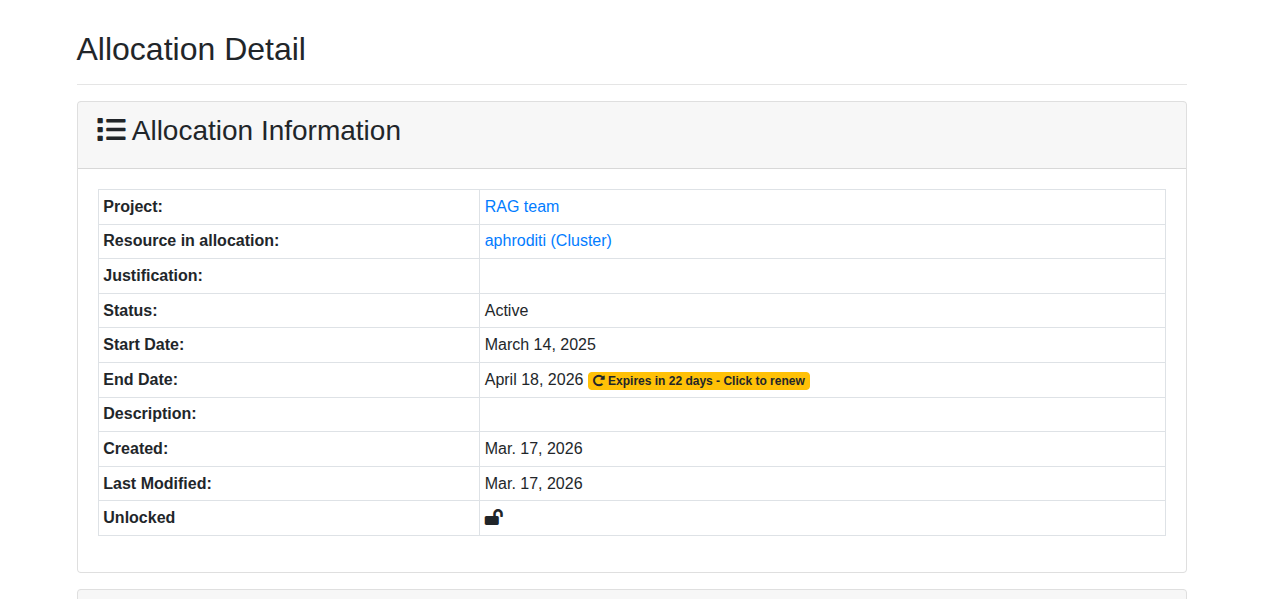
The Allocation Detail page provides a comprehensive overview of your active resource request, including:
- Status: The current state of your request (e.g., Active, Expiring, Renewed).
- Validity: The Start and End dates for the allocated resources.
- Resource Access: Which specific hardware or storage resources are included.
Advanced Resource Configuration
For HPC clusters, specific technical parameters are managed through Allocation Attributes. When an allocation is approved by the HPC team, these details will be visible in the "Allocation Attributes" table. Depending on the type of resource, these attributes may vary. Below is an example of an HPC cluster allocation and its attributes:
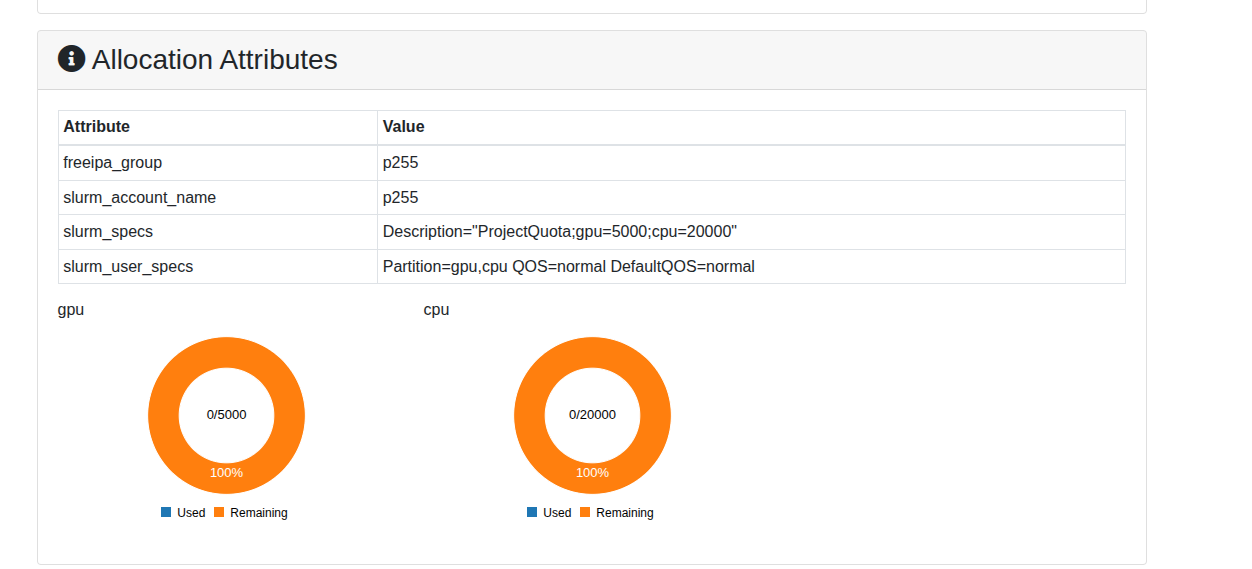
The screenshot above shows the allocation details of an HPC cluster allocation. The specific example shows a project with:
- Slurm account name: A project name of p255
- Partition access: Access to only CPU and GPU partitions
- Usage quota: The amount of resources allocated to the project (20000 CPU hours and 5000 GPU hours)
Managing Team Access
PIs and Managers can control which team members have access to each specific allocation:
- Add/Remove Users: Click the Add Users or Remove Users buttons to instantly provision or revoke access for your project collaborators.
- User Status: View the current access status of all team members (e.g., Active, Pending EULA).
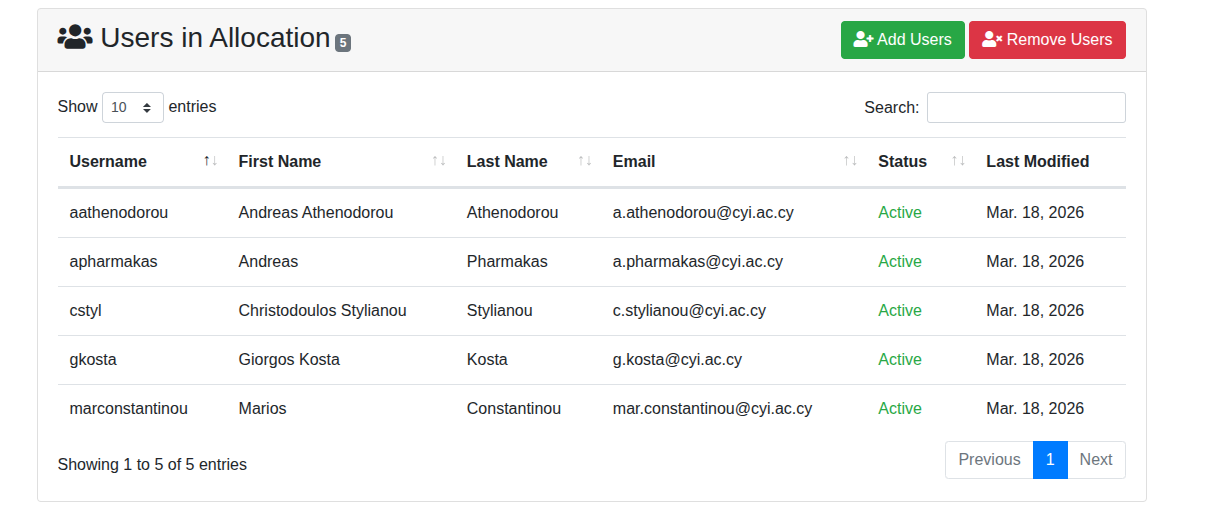
Note: Changes made here are automatically synchronized with our authentication (FreeIPA) and resource management systems.
Approval & Notification
Once an Allocation request is submitted, the HPC Facility team will review the technical justification.
- PIs and Managers can track the status of the request directly in the ColdFront Project page.
- When the allocation is approved and activated, project members will be notified via email that their resources are ready to use.
- Only at this point will users be able to SSH into the allocated clusters.