HPC Access and Login
Obtaining an account
Our facility uses a two-step process for granting access. First, a project application must be submitted and approved. Second, individual users can request their personal accounts under that approved project.
-
Project Application: To gain access to our HPC systems, the Project's Principal Investigator (PI) must first submit a "Cyclone Access Application". More details on this process can be found on our "How to Apply" page.
-
Individual Account Request: Upon approval of the project, each team member who requires access should request their individual user account by following the steps below:
- If this is the first time you are requesting access, you need to submit the "Request a new account" form through our helpdesk portal. Request a new account
- If you already have an account on one of our HPC systems and you would like to associate it with a new approved project, please submit the "Add existing user account to project" form: Add existing user account to project
When filling out the form, for the "Proposal ID" field, please use the ticket number of your approved "Cyclone Access Application" (e.g., "HPCF-1234").
Please note:
- A user account will only be created after the project application has been approved.
- You must be listed as the Principal Investigator or a collaborator on an approved project to be granted access.
- To add new collaborators to a project after it has been approved, the Principal Investigator should contact hpc.support@cyi.ac.cy.
Once the above has been done, you will be contacted by the HPC Facility team with your login details.
Generating SSH keys
In order to generate a SSH key pair follow the below steps:
Linux/Mac
Create a public and private key pair using the following command:
ssh-keygen
You will be prompted for a filename for saving the private key. You should press Enter to use the default name: /home/username/.ssh/id_rsa You will be prompted for a password to protect your private key which you will also confirm. ALWAYS use such a password to protect your private key. ssh-keygen will then create a private and public key. The public key will have a .pub extension (e.g., id_rsa.pub)
Windows
Using PuTTYgen
- Download the PuTTYgen tool here
- Run the tool executable (puttygen.exe)
- Click Generate
- Move your mouse over the blank area
- Add a passphrase to your key in the Key passphrase and Confirm passphrase boxes.
- Save your key pair by clicking the Save public key and Save private key buttons. The private key will have a .ppk extension (e.g. private_key.ppk)
Using OpenSSH
First check if the OpenSSH client is installed.
- Open the Settings panel, then click Apps.
- Under the Apps and Features heading, click Optional Features.
- Scroll down the list to see if OpenSSH Client is listed.
- If it's not, click the plus-sign next to Add a feature.
- Scroll through the list to find and select OpenSSH Client.
- Finally, click Install.
Then open the OpenSSH client and proceed with the key generation:
- Press the Windows key type cmd.
- Under Best Match, right-click Command Prompt. Click Run as Administrator.
- If prompted, click Yes in the Do you want to allow this app to make changes to your device? pop-up.
- In the command prompt type:
ssh-keygen - By default, the system will save the keys to C:\Users\your_username.ssh\id_rsa. You can use the default name, or you can choose more descriptive names. This can help distinguish between keys, if you are using multiple key pairs. To stick to the default option, press Enter. Note: If a file with the same name already exists, you will be asked whether you want to overwrite the file.
- You'll be asked to enter a passphrase. Enter a safe passphrase.
- The system will generate the key pair, and display the key fingerprint and a randomart image.
- Open your file browser.
- Navigate to C:\Users\your_username.ssh.
- You should see two files. The identification is saved in the id_rsa file and the public key is labeled id_rsa.pub. This is your SSH key pair.
Note: Normally, the public key is identified with the .pub extension. You can use Notepad to see the contents of both the private and public key.
HPC systems hostnames
The table below lists the login hostname for our primary open-access system. Other systems like Nepheli and SimEA are for dedicated projects and access is managed separately.
| System | Hostname |
|---|---|
| Cyclone | cyclone.hpcf.cyi.ac.cy |
HPC systems login
Linux/Mac
If your private key is stored in your .ssh folder in your home directory:
$ssh username@hostname
You may need to use the following command even if the private key is stored in your .ssh folder:
$ssh-add /key_path/id_rsa
If the key is stored in another directory or in a usb:
$ssh -i /key_path/id_rsa username@hostname
If you encounter a problem with your key permissions, go to the directory where the key is stored and do the following:
$chmod 600 .ssh/id_rsa
As hostname use the hostname in the above section.
Windows
Using PuTTY
- Download PuTTY here.
- Run the executable (putty.exe)
-
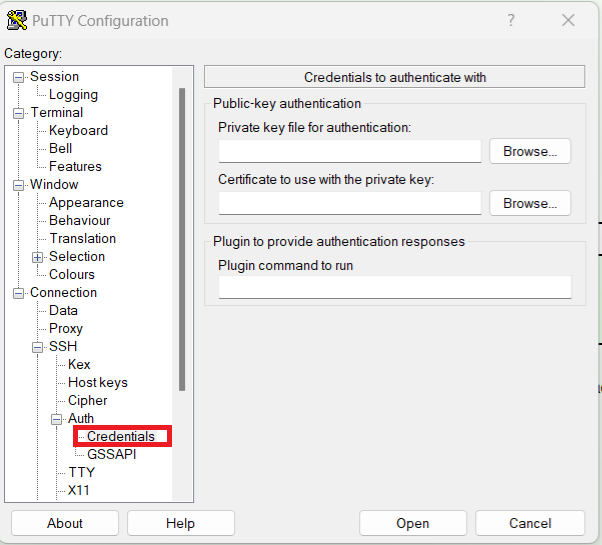
Browse for and select your private key file.

-
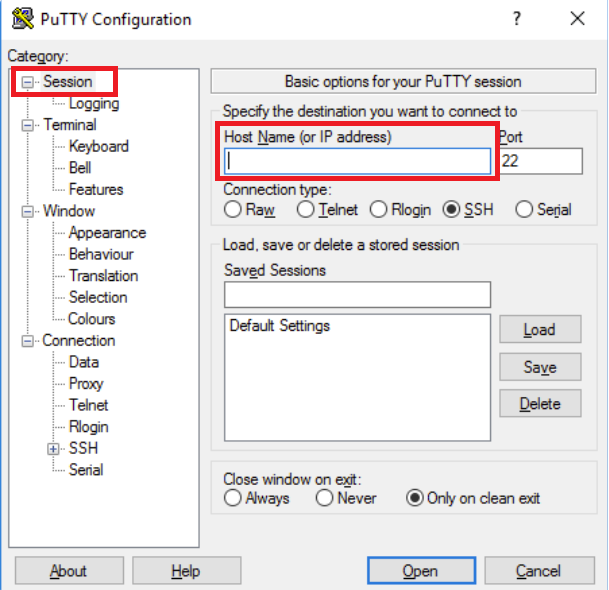
Enter login information in the Host Name box (e.g. username@hostname) and click Open

Using OpenSSH
-
Make sure the ssh-agent service is running by using the following command in powershell:
Get-service ssh-agent
-
If the service is not running you need to go to Services and find OpenSSH Authentication Agent. Right click > Properties and change the Startup type to Manual or Automatic, apply the changes and then click start.
-
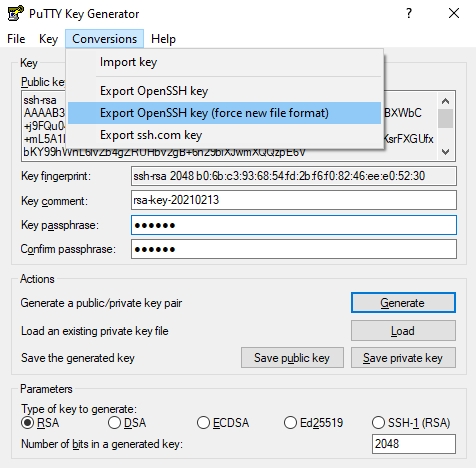
If you have created your key using puTTY you will need to save it using the openssh format. Open puTTYgen.exe and load your key by navigating to File > Load private key. Then under conversions select Export OpenSSH key( force new format).

-
After starting the ssh-agent service you need to add your private key to the agent. You will be asked for your key's passphrase before it is added to the agent.
ssh-add C:\DIRECTORY\WITH\KEY\id_rsa
-
If you receive the following error, you need to change the permissions of the key by right clicking the key file going to Properties > Security > Advanced and removing all other user permissions.

-
Finally to connect to your chosen cluster you need to type:
ssh username@cluster.host.name